Using Keycloak with Himmelblau
This guide shows how to configure a Keycloak OpenID Connect client for Himmelblau. Keycloak acts as the OIDC issuer, and Himmelblau uses the Keycloak client ID as its app_id.
The Keycloak client must allow OAuth 2.0 Device Authorization Grant. This is required for the classic Device Authorization Grant login flow, and it is still required when using the Himmelblau orchestrator.
Prerequisites
Before you begin, make sure you have:
- A working Keycloak instance.
- Administrator access to the Keycloak realm that should authenticate Linux users.
- Himmelblau installed on the Linux client.
- Network connectivity from the Linux client to the Keycloak issuer URL.
The examples below use these values:
| Value | Example |
|---|---|
| Keycloak base URL | https://keycloak.example.com |
| Realm | himmelblau |
| Client ID | himmelblau-login |
| Issuer URL | https://keycloak.example.com/realms/himmelblau |
Replace these examples with values from your own Keycloak environment.
Authentication Flows
Himmelblau can authenticate against Keycloak in two user-facing ways.
Classic Device Authorization Grant
Without the orchestrator, Himmelblau uses the Device Authorization Grant directly. During login, the Linux system displays a URL and code, or a QR code. The user opens the URL in a browser, often on another device such as a phone, and completes the Keycloak login there.
This flow is useful because it does not require the Linux login screen to host a full browser interaction. The tradeoff is that first login is not completed entirely at the Linux login prompt.
Orchestrated Login
With orchestrator_enabled = true, available in Himmelblau 4.x and newer, Himmelblau orchestrates the login through the native Linux PAM flow. The user enters their Keycloak credentials through the local Linux login prompt, and the sign-in is completed on the same device.
The orchestrator changes the login experience. It does not remove the requirement to enable OAuth 2.0 Device Authorization Grant on the Keycloak client.
Create the Keycloak Client
Log in to the Keycloak Admin Console and select the realm that should authenticate Himmelblau users. In this guide, the realm is himmelblau.
In the left navigation, open Clients, then select Create client.
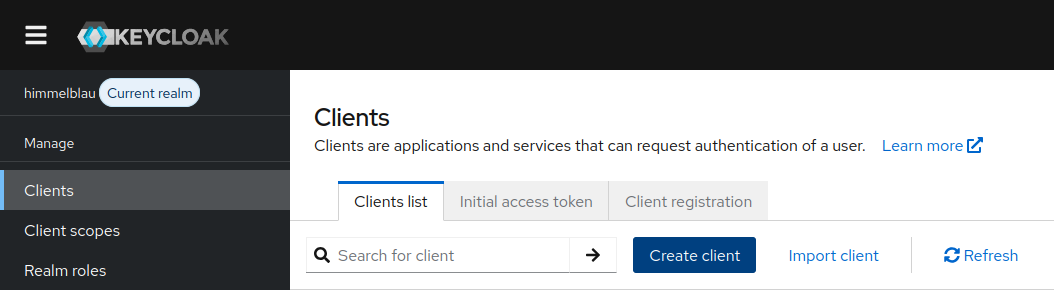
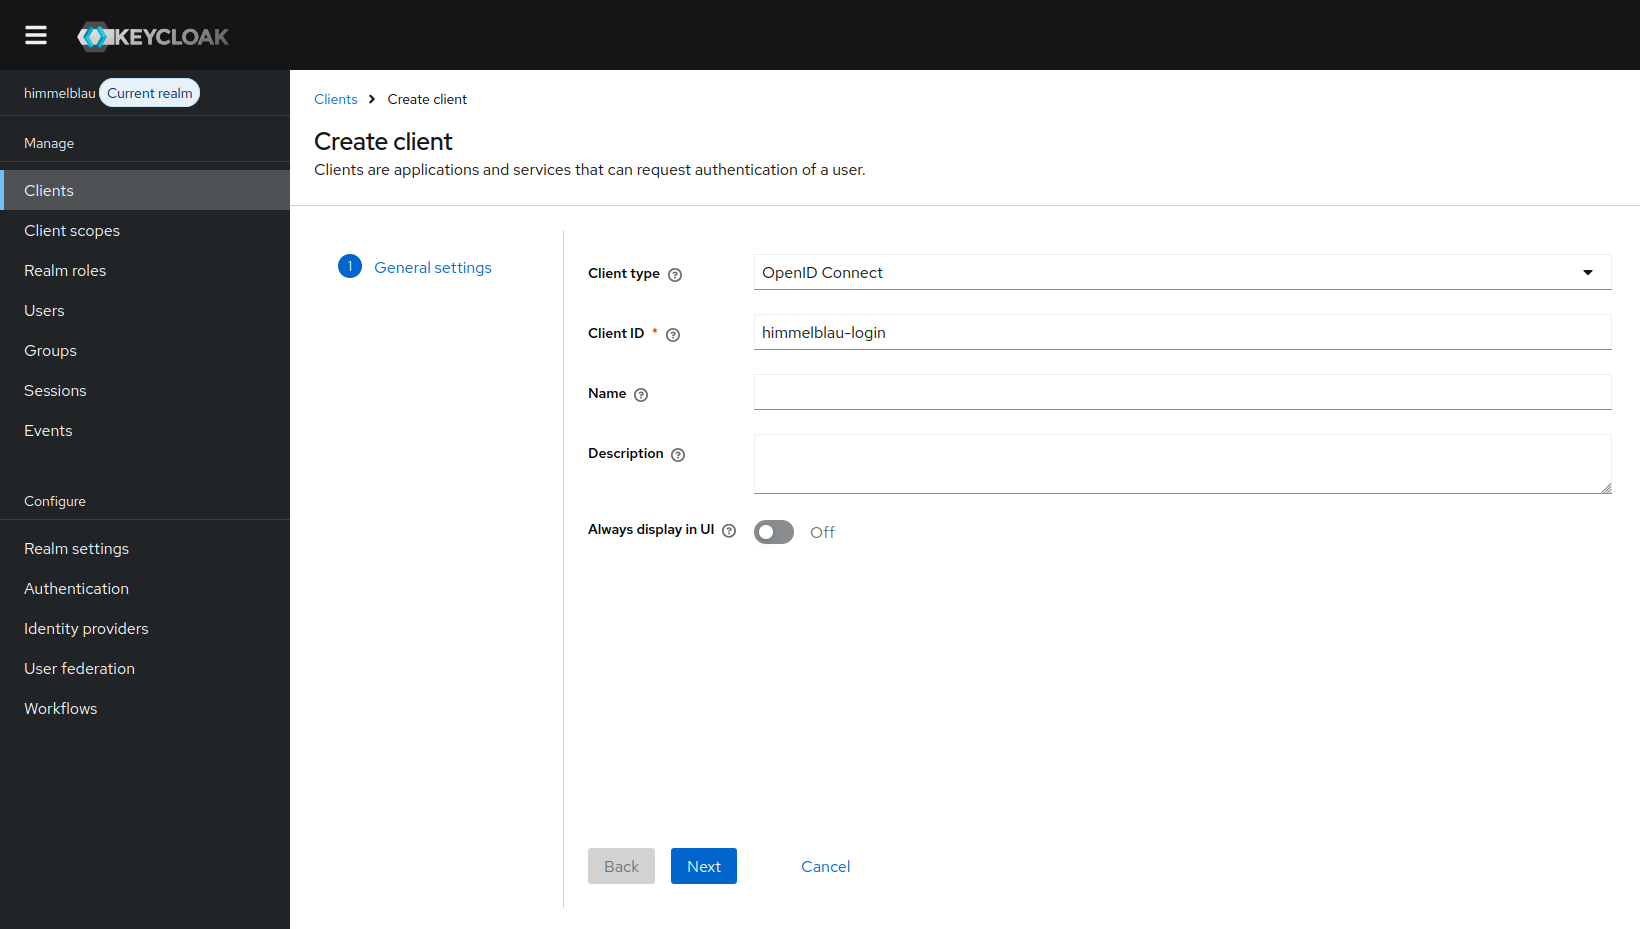
For Client type, select OpenID Connect. Set Client ID to the value that Himmelblau will use as app_id.
For example:
himmelblau-login
Then click Next.
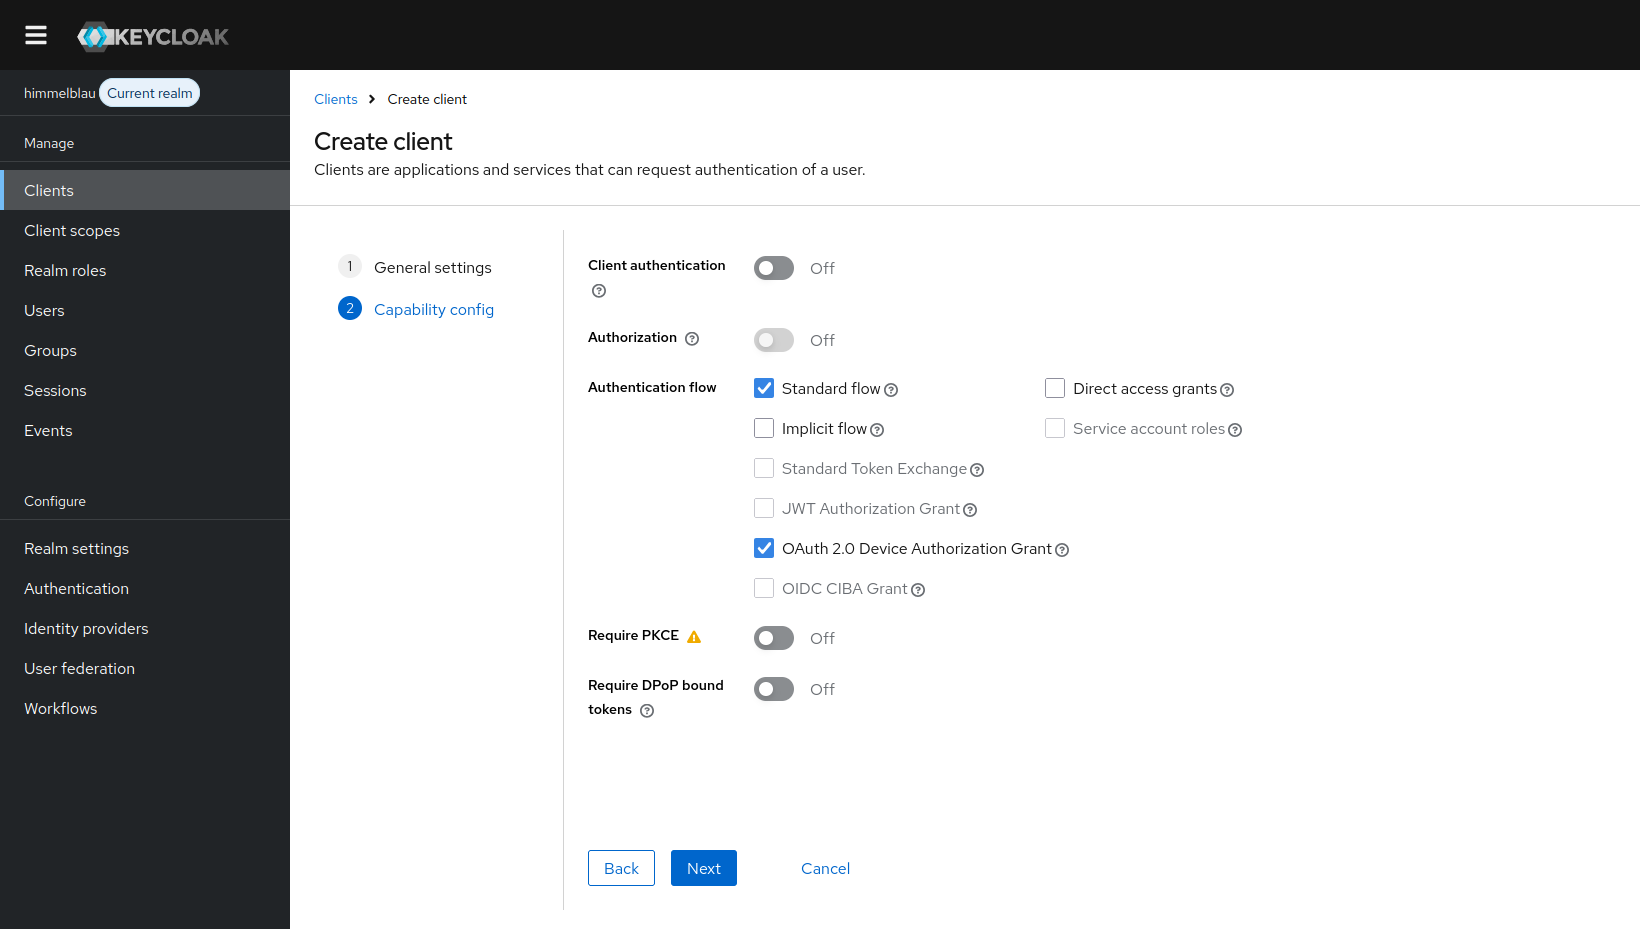
On the capability configuration page, enable OAuth 2.0 Device Authorization Grant.
Leave the other authentication flow settings at their defaults unless your environment has a specific reason to change them. The important setting for Himmelblau is that OAuth 2.0 Device Authorization Grant is enabled.
Click Next.
On the login settings page, leave the URL fields blank. Himmelblau does not need a web redirect URL for this client setup.
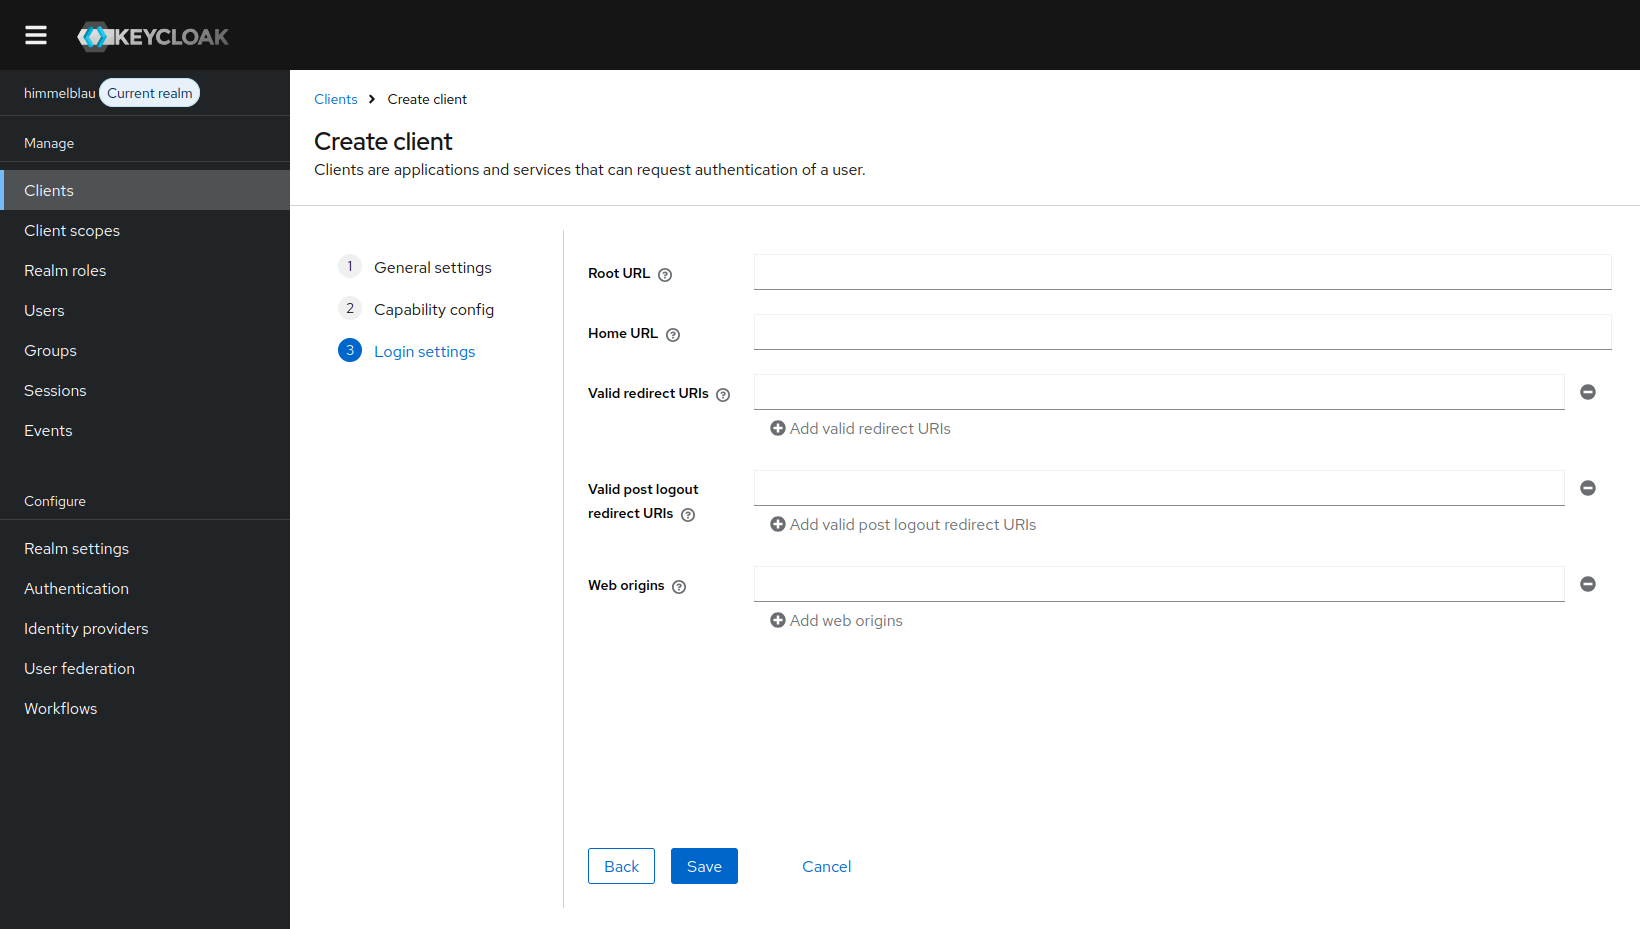
Click Save.
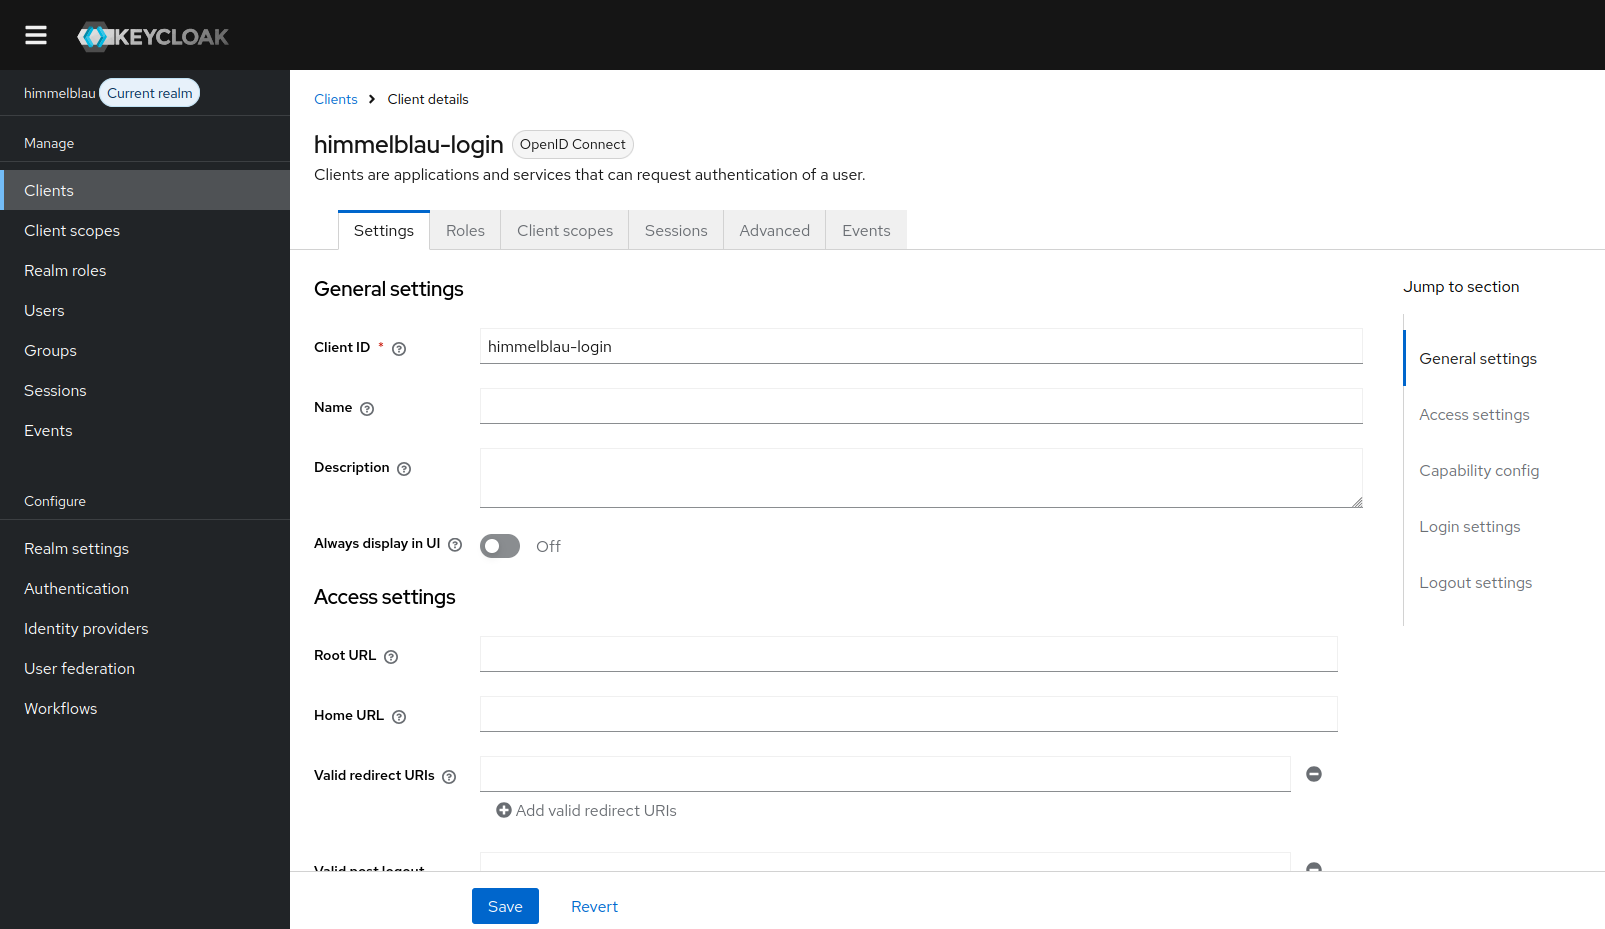
Keycloak opens the newly created client. Confirm that the client exists and that the client ID matches the value you plan to configure in Himmelblau.
Configure Himmelblau
Edit /etc/himmelblau/himmelblau.conf on the Linux client.
For the classic Device Authorization Grant flow, use:
[global]
oidc_issuer_url = https://keycloak.example.com/realms/himmelblau
app_id = himmelblau-login
For Himmelblau 4.x and newer, you may optionally enable the orchestrator:
[global]
oidc_issuer_url = https://keycloak.example.com/realms/himmelblau
app_id = himmelblau-login
orchestrator_enabled = true
The configuration values are:
| Option | Description |
|---|---|
oidc_issuer_url |
The Keycloak realm issuer URL. For a realm named himmelblau, this is https://keycloak.example.com/realms/himmelblau. |
app_id |
The Keycloak client ID. This must exactly match the client ID created in Keycloak. |
orchestrator_enabled |
Optional. Only relevant for Himmelblau 4.x and newer. When set to true, Himmelblau uses the native PAM-oriented orchestrated login flow on the same device. |
The oidc_issuer_url must match the issuer advertised by Keycloak for the selected realm. The app_id must match the Keycloak client ID, not the realm name or the display name.
Apply the Configuration
Restart the Himmelblau services after changing /etc/himmelblau/himmelblau.conf:
sudo systemctl restart himmelblaud himmelblaud-tasks himmelblaud-orchestrator
Then test authentication with a Keycloak user:
sudo aad-tool auth-test --name user@example.com
Replace user@example.com with the account identifier your Keycloak realm expects.
With the classic Device Authorization Grant flow, the test or login flow should show a URL and code, or a QR code, and the user completes authentication in a browser.
With orchestrator_enabled = true on Himmelblau 4.x or newer, login should use the native Linux PAM flow and complete on the same device.
Troubleshooting
If authentication fails, check the following items first:
- Confirm that the Linux client can reach the Keycloak issuer URL over HTTPS.
- Confirm that you selected the correct Keycloak realm before creating the client.
- Confirm that
app_idexactly matches the Keycloak client ID. - Confirm that
oidc_issuer_urlpoints to the realm issuer URL, for examplehttps://keycloak.example.com/realms/himmelblau. - Confirm that OAuth 2.0 Device Authorization Grant is enabled on the Keycloak client.
- Do not disable Device Authorization Grant just because the orchestrator is enabled. The Keycloak client still requires it.
- If you set
orchestrator_enabled = true, confirm that the client is running Himmelblau 4.x or newer and that thehimmelblau-orchestratorpackage is installed.
Use the system journal for detailed logs:
journalctl -u himmelblaud -u himmelblaud-orchestrator
If you enable debug = true in your himmelblau.conf, the logs will include additional detail about provider discovery, token requests, and authentication flow selection.